USING THE FULL POTENTIAL OF SALESFORCE COMMERCE CLOUD (SFCC) SEO FUNCTIONALITY

In today’s world, it is increasingly important to do search engine optimization on your website because nearly half of customers start their shopping using a search engine. If we want our business to be successful online it is vital to use all available resources that Commerce Cloud offers to optimize your website for search engines. 

Based on SEO that we can manage, we can divide it into two categories: On-Page SEO and Crawlability. On-Page SEO refers to the keyword strategy that we will apply on on-site content across different pages of our website. It includes storefront URLs, titles, descriptions, H1 tags, Image Alt tags, and other on-site content. Another category we must pay attention to is crawlability, which refers to the ability of search engines to find and index pages on our website. It includes the following elements: sitemaps, canonical tags, robot.txt, redirects, error handling, and 404 pages. 


Let’s start exploring all that we are offered in Merchant Tools under SEO.

Before We Start

One thing you need to have before you start is access to a sandbox and account manager.


All You Need to Know about URL Rules

In case you are shown Search Support Preferences when you visit Merchant Tools > SEO > URL Rules,  it means you have not enabled Storefront URLs. 


url


To do so you have to go to Merchant Tools > SIte Preferences > Storefront URL and check Enable Storefront URLs. This is usually activated by default as this is considered SEO friendly option. One benefit of enabling this is that 301 redirects (this is a permanent redirect from one URL to another) will be implemented automatically. 


In URL Rules, the purpose of General tabs is to inform us when two different pages are generating the same URL and show us that conflicting URL. Check for unique URLs for categories, folders, and pipelines that will be performed in this tab. One of the common duplicate URLs is for category page URLs. Let’s say a category has a category URL rule configured to use category display name and that there are two different categories with the same display name. In this case a conflict will be shown. The system solves this issue by appending a dash and index number to each duplicate category. For example, if we have two categories with display name coats, the first one will be resolved as coats-1 and the second one as coats-2. If a pipeline URL conflicts with a category URL we will be shown a global conflict. 


When we are creating an alias for pipeline URL it can’t conflict with any existing category or folder URL. For example, since a /shipping folder URL already exists we can’t create a pipeline URL alias /shipping.  


When dealing with Search Refinement URLs you add refinement information to the URL path. However,  conflicts can occur with refinement values after URL cleansing. This will be resolved in a similar way as with categories and folders by adding index number delimiter at the end of the refinement value.  


In case you would like to resolve these issues manually you can do that from the product data side by changing category display name or you can make an URL override for one of the URLs and use the pageURL category attribute. 


When you want to configure some general settings you go to Merchant Tools > SEO > URL Rules - Settings tab, and it will look something like this.   


url


Lowercase URLs help with maintaining readability and mitigate any problems that might be caused by customers using capital letters instead of lowercase letters.

It is recommended that white spaces are replaced with a hyphen (“-”) because a hyphen is considered a separator by search engines and it is customer friendly. In case we don’t do this,  the default value for white spaces will be %20.


If we want to do any other character replacement, we will use the Edit Rules button we can see in the image above and add our custom replacement rules. We can also map them to no characters if that is what we need. 


characters


Since ampersand is not customer friendly because it will be rendered as %26 by default, we can replace it with and. This character shows up often in URLs since it acts as a delimiter between words. Here is an example of a URL before we applied our custom replacement rules: https://domain.com/home-%26-kitchen.

But after enabling custom rule it would look like this: https://domain.com/home-and-kitchen


Lastly, if we want to use URL override we will enable Character Replacement for ‘pageURL’


URL rules allow us to put any attribute into category URL. This is done by going to the Catalog URLs tab. To be able to define the category URL in a way we want we have to look at what each option represents and how it affects our URL.


atribute


URLs character length also affects SEO and URLs over 75 characters long have lower SEO ranking. Therefore, consider not using category-path if you have a deep category structure. 


category


Enable override with page URL allows us to override the generated URL, in case we choose to do so. Then we have the trailing slash checkbox, in regards to it as best practice we would recommend that you append the trailing slash to the category URL. The categories are considered directory for the purposes of SEO, and as the best practice, a directory should be followed by a trailing slash. As for generating URL mapping for offline categories we recommend you deselect this because during replication to production they will go live. This should be used for temporary offline categories in order to prepare for a new product collection. We should also change display names or IDs after the category is finalized. With this setting, you can avoid generating URLs for all offline categories, thereby avoiding conflict handling that may cause categories to use non-SEO-friendly online category URLs. Also, we recommend enabling category search refinement URLs because they allow us to identify specific filters which may exist on category pages. Instead of having those filters being shown as parameters in URL we can make them appear as a nice, clean subdirectory of categories.


Here is a good example of how this functionality works. We have identified three individual attributes that we would like to incorporate as refinements in the URL.

Before: http://www.domain.com/mens/accessories/hats/?prefn1=refinementColor&prefv1=Black

After: http://www.domain.com/mens/accessories/hats/black


Next, we will talk about product URL settings. They use a similar principle as category URLs. You have the ability to reference specific attribute values ​​for any attributes to be included in the URL. We can use the following configuration options to define product URL endpoints. You should note that product ID and extension .html are mandatory for each product URL in order to make each URL unique.

atribute


atribute


As before, enabling override with the page URL attribute allows us to override the generated URL. Unlike a forward slash, the use of hyphen product ID separator puts a separator between ID.html and the rest of the generated product URL. The forward slash is usually used for directories and product pages which are not directories. Product pages are single elements.


We also have the ability to configure pipeline URL aliases by going to Merchant Tools > SEO > URL Rules and then going to Pipeline URLs tab. This is pretty important to your site as well. A pipeline is a process that runs on the backend. For example, your checkout process is driven by pipelines. If we didn’t map aliases to various pipeline IDs, we would have really long URLs that are also not customer friendly. What you can do is simply identify the pipeline ID and map it for a nice clean alias. 


pipeline


This will also help you get rid of on/demandware.store portion of the pipeline which is good from a branding perspective.

An example of this would be. 

Before: http://www.domain.com/on/demandware.store/Sites-SiteID-Site/default/Account-StartRegister 

After: http://www.domain.com/register/

URL Redirects

The URL redirection function redirects outdated or unavailable B2C Commerce pages to the currently available pages, or specific URLs outside of B2C Commerce. To use this feature, you must have the correct site-level permissions. This feature does not apply to redirects from external platforms. It is usually used during the transition period from the old website to the new Salesforce B2C Commerce site. You should also note that URL redirects must be replicated from staging to production.

Basics of aliases

If we want to configure aliases, we go to Merchant Tools > SEO > Aliases. Hostname aliases are a way to define alternate names for existing website URLs. You must set up and register a DNS and domain name to use these additional hostnames in the aliases. The hostname aliases generate a 301 redirect for the host-only URL. They also enable you to redirect URLs to sites specific to the locale or device. We can also have multiple domains active and they all point to our site. Or we can have misspelling aliases that are used for common misspellings of our site name.

{

    "__version": "1",

    "settings": {

         "http-host": "httphostname",

         "https-host": "httpshostname",

         "job-hostnames":

          {

            "default":"www.default-host.com",

            "fr":"www.french-host.com",

            "en":"www.english-host.com"

          },

         "site-path": "sitepath",

         "default" : "defaultValue",

         "site-path-trailing-slash" : "yes"

        },

    "hostName1": [

       { someMappingRule1 },

       { someMappingRule2 }

     ],

    "hostName2": [

       { someMappingRule1 },

       { someMappingRule2 }

    ]

}

Here we can see that in the settings portion we define optional parameters like HTTP, HTTPS, job hostname, trailing slash, and so on. Then we have a hostname portion of parameters where we use the entered URL. Since you can have multiple hostnames you can also enable the site to handle requests for multiple hostnames. For each hostname, you can include multiple mapping rules.


In order to understand this better let’s divide it into smaller parts. We’ll start with this one.

{

    "__version": "1",

    "settings": {

         "http-host": "www.your-domain.com",

         "https-host": "www.your-domain.com",

         "site-path": "EU",

         "default" : "true",

         "site-path-trailing-slash" : "yes"

        }

}

The version portion of this .json file is mandatory and its value must be 1. This is to identify the syntax version of the file. If we change it to any other number, all that we write will be ignored. Then we have settings that are entirely optional and we don’t even have to have them, but with it, we can define certain properties. At the beginning we have http-host and https-host they define preferred http and https hostnames, the second one is required if we want to have a secure connection. Then we have a site-path property which is a delimiter that extends http and https and helps differentiate between different sites using the same hostname. The default property will redirect to the default site if the entered URL doesn’t exist. If we don’t specify it’s value it will be false. In the end, we have a trailing slash which if we set to yes will add a trailing slash to the redirected URL, which as we have said before is a good SEO practice.

{

   "__version": "1",

   "www.your-domain.com" : [

      {"pipeline": "Home-Show" }

   ],

   "production.demandware.net" : [

      {"pipeline": "Home-Show" }

   ],

   "your-domain.com": [

      {"host": "www.your-domain.com", "path":"/"}

   ]

}

This example shows simple aliases and how we would handle requests from different hostnames. It is important that every production alias includes an address for your production instance as well as your DNS hostname address. Your production address can also include the realm or name of a partner who is developing your site.


For each hostname or domain name you have a storefront content for, there should be at least one mapping rule in the aliases file. It should have an IP address in your DNS that corresponds to one of the production instance's IP addresses.


Static Mappings

As with previous modules, this one is also located in the SEO section at Merchant Tools > SEO > Static Mappings. If we want to use static mapping, we first have to configure hostname alias in aliases we talked about in the previous chapter. 

We use it for specific pages, whether they are landing pages or searches that don't fit a general pattern. You can create a static mapping of new URLs from existing legacy URLs. These URLs can be dynamic pipeline calls or static resources. However, the source URL must be unknown to the system. The static mapping must be replicated from the staging instance to the production instance. Each line contains just one mapping definition, where the two parts are separated by spaces. When you want to add a comment line use ASCII '#' or '! '. To map URLs that contain whitespaces use whitespaces enclosed in single quotes. Wildcards can be used only to append or prepend an URL but not both. 


For example, if we configure static mapping with whitespaces it would look something like this.

"/static mapping" p,,,Search-Show,,prefn1,brand,prefv1,"Brand Name"

And if we had an incoming URL that was something like http://www.domain.com/Brand Name we would be redirected to http://www.domain.com/Sites-SiteID-Site/default/Search-Show?prefn1=brand&prefv1=Brand%20Name


Dynamic Mappings 

The mapping rule identifies the pattern of the incoming URL and maps it to the pattern of B2C Commerce URL. Creating a few mapping rules allows you to effectively manage many URLs in the legacy site. You cannot use dynamic mapping rules to redirect existing or legacy URLs to other URLs, nor can you create redirects for static resources (such as images). These mapping rules are used when we want to redirect large numbers of similar URLs (for example, when we want to redirect all URLs in a specific category). In case we want to redirect just one specific URL, we would use static mapping. 


Every mapping rule is identified by the URL pattern and B2C Commerce URL template, but we can also have specific options between them. The URL pattern identifies the incoming URL, and the URL template generates a B2C commercial URL for the redirect. Any part of the incoming URL that matches with wildcards (*, **) can be referenced by its position in the URL using the numbering parameter in the template {0}. For example, let’s say we have:

/**/practice/** s,,,,,/{0}/{1}

With this pattern, we would find the following:

http://www.domain.com/path/to/practice/even/more/paths

    {0} : path/to

    {1} : even/more/paths

http://www.domain.com//practice/

    {0} :

    {1} :

We would find the second one only because it has a trailing slash, but we would not find these. 

http://www.domain.com/practice/even/more/paths

http://www.domain.com/path/to/practice

We would not find the first one because it doesn’t have an extra slash before practice and the second one because it doesn’t have a trailing slash after practice.


URL Request Analyzer

This is a really helpful tool that is located at Merchant Tools > SEO > URL Request Analyzer. It provides detailed information about URL requests. This tool can help you understand how storefront URL requests in Salesforce B2C Commerce are processed and which configuration to use to open the corresponding storefront page. It can help determine the root cause of invalid URLs, 404 error pages, and URLs that did not lead to the intended target.

You can also use this tool to test sensitive configurations that may affect SEO, allowing you to identify possible issues before going live.

The advantage of this tool is that it is really simple to use. We just enter URL we want to analyze, like, for example, https://www.domain.com/electronics/.

In business manager, it would look like this.


request


Clicking on the add button will create a URL with a preview link. When we visit that preview icon it will process a request to a storefront and then we can click the URL to review recorded information which shows a step-by-step analysis of how the URL has been analyzed and processed.
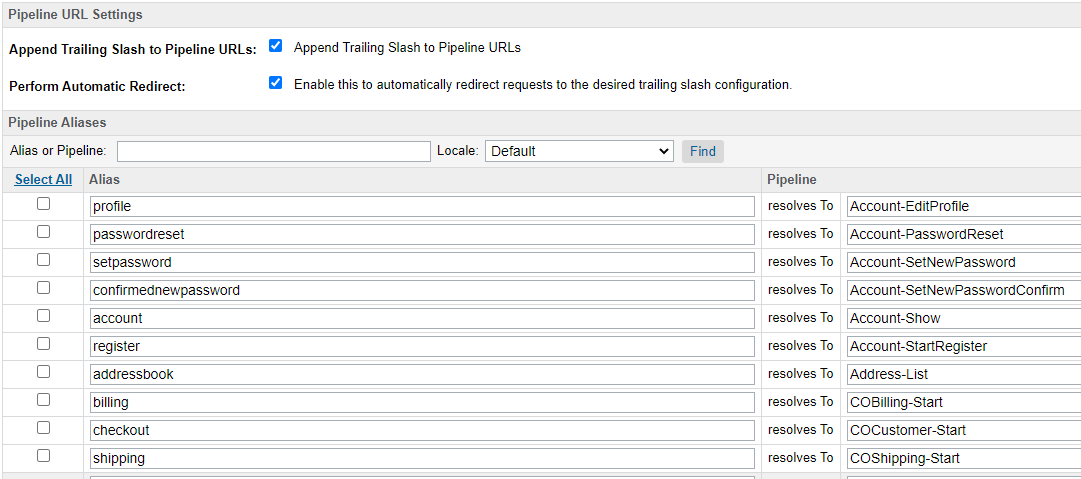
 

Page Meta Tag Rules

So within the Commerce Clause platform, there are three different ways you can manage your metadata. The first is to manually manage these fields in the business manager, where you navigate to the individual category product or content that you would like to create metadata for and enter it there. For the second option, you have a bulk import tool, which is an Excel template that allows you to populate metadata information for product category and contents and upload it directly into the business manager. And finally, we have a new feature we will focus on - it is called Page meta tag rules which provide you with the capability to generate and manage meta tag content on a large scale. The feature includes a rule-based capability to create metadata for home page product pages and content pages. We can access this feature by navigating to Merchant Tools > SEO > Page Meta Tag Rules.


dashboard


So, as you can see, these rules are available directly in business manager and they allow you to create a rule-based approach to metadata. You can localize and optimize SEO meta tags by leveraging existing static and dynamic controls. So you have the ability to create rules to put in different variables, such as search terms or site names into the meta tags. This allows you to create unique meta tags to avoid duplicate or missing information. It also enables you to maximize search engine rankings and boost ROI by acquiring new customers organically.


To be able to make effective use of rules we first need to understand the syntax which consists of operators and conditions.

First, we have IF THEN (ELSE) (ENDIF) construct which allows us to make conditions when something will be used. For example 

${IF Site.displayName THEN Category.pageTitle ELSE Constant(‘Shop’)}

Then there are usual operators AND and OR. Here’s an example:

${IF SearchRefinement.refinementColor OR SearchRefinement.size THEN Constant(‘noindex,nofollow,noarchive’) ELSE Constant(‘index,follow,archive’) AND Constant(‘Shop’)

As you can see, it’s long but it’s not complicated. It just says that if your search refinement is color or size then the constant will be noindex, nofollow, noarchive, and it will have a constant shop at the end. Otherwise it will be index, follow, archive and shop.

In case we have EQ (equals) operators. 

${IF Category.ID EQ hidden THEN Constant(‘practice’) ELSE Constant(‘learn’)

This rule just tells us that if the category id is equal to hidden then it will have a constant practice. Otherwise we will have a constant called “learn”.

The last operator we have to learn is CONTAINS, which doesn’t have to be an exact match like the previous one. Let’s say we have the following example:

${IF Category.ID CONTATINS Constant(‘hidden’) THEN Constant(‘practice’) ELSE Constant(‘learn’)

This just tells us that if the category id contains a constant hidden then we will have constant practice. Otherwise we’ll have “learn”. 


Let’s make a rule for our Home page by clicking on the New button next to the Homepage on the dashboard.


entry


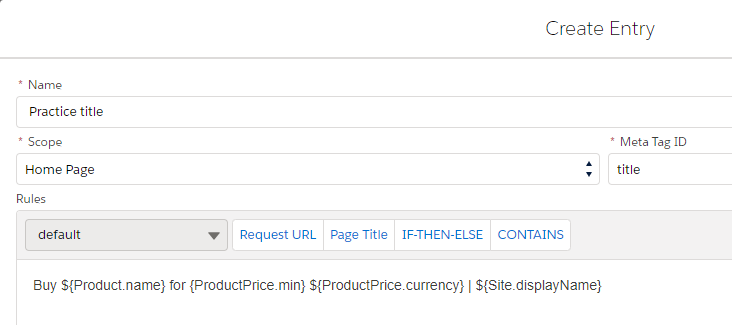
This rule will put a product name with its minimum price and currency plus site name at the end in the format as we specified. 

Short Codes in the Rule Editor allow you to quickly define a rule by utilizing text snippets for common use cases. Clicking a shortcode will insert predefined rule text snippets for Request URL, Search Phrases, IF-Then-Else, or Contains and more. The Page Meta Tag Rule editor now checks and validates syntax that is being entered into the text box and will display an error for invalid syntax.


Now let's say we want to make a rule that references the sitemap attribute to determine if a page should get robots tag noindex, nofollow. Otherwise page should get an index, follow. So we would create a new rule for the product detail page with meta tag id of robots. At the end, we define our rule.


example


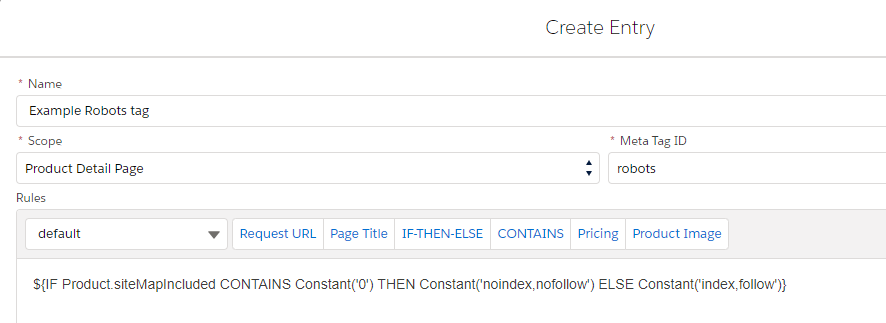
When we save our rule we have to assign it to specific products or entire categories.


When creating meta descriptions you should also optimize them for the AIDA principle, that is how you get customers’ Attention, hold their Interest, create Desire, and drive them to Action.


Final Thoughts

If you got to this part then you have learned a lot about how to use Salesforce Commerce Cloud to optimize your site for SEO and how you can help your site generate more traffic. Since no one can do all of these things we have talked about perfectly you should make priorities based on your budget and resources so that you get the most from your investment. Don’t be afraid to change your strategy if one of your efforts starts to show diminishing returns. Just keep in mind that the goal of any SEO optimization is to get more traffic to your site’s content. 


With the knowledge gained here, you are sure to drive your site to the top!