HANDLING CUSTOM SHIPPING AND PAYMENT METHODS IN SFCC

You must have had shoppers that abandon their carts at the payment part of the checkout flow. Did it happen because your payment or shipping options didn’t suit them? To increase your conversion rates, you should consider adding new custom payment or shipping options that are not included in the base options of your site. In this guide, you will learn how to add a new custom payment and shipping methods to your Salesforce Commerce Cloud site. We will also show you how you can configure your custom shipping methods to suit your needs perfectly. 

Before We Continue

Make sure you have access to a sandbox you can use to test these features out. We will be working with our own app_practice cartridge that will contain all the custom code made here and it will be on top of the base SFRA cartridge. You will need to set up your Visual Studio code so you can make all the necessary changes in the backend.

Make shipping options tailored to your needs

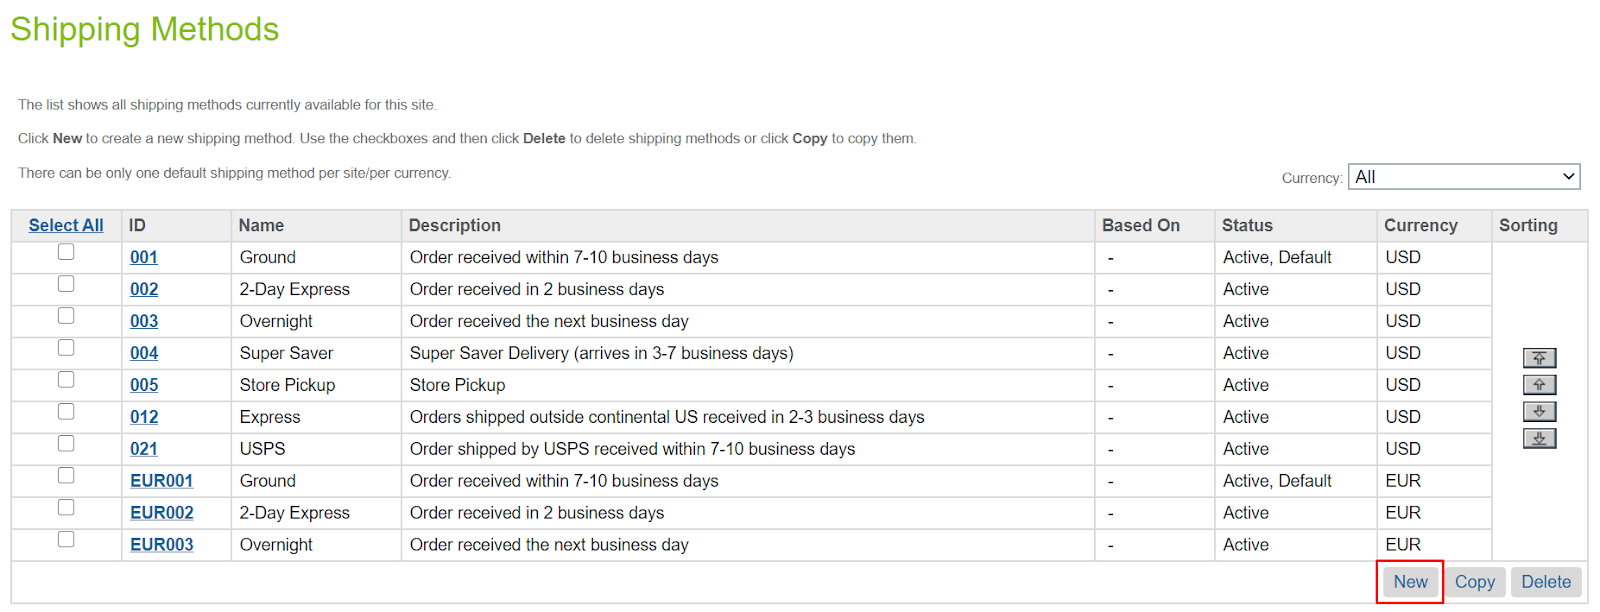
In SFCC, custom shipping is something you might want to do more often to fill your customer needs and this is where we will start. Your customers can select your shipping options during the checkout process on your website, retails store, or by calling Customer Service. By adding a custom shipping method some general information about it will show up in your shipping methods list. To view all shipping methods that are currently available on your site visit: Merchant Tools >  Ordering >  Shipping Methods.  All basic information about shipping will be available here including their name, description, status, currency as well as display priority. Display priority is changed by checking a box next to the ID we want to change and then moving it up or down with the help of arrows in the sorting column. We can change all those things for current shipping methods by clicking on its ID in the ID column.

shipping methods


After that, we will put in some basic information for our custom shipping method. See the example below.

general


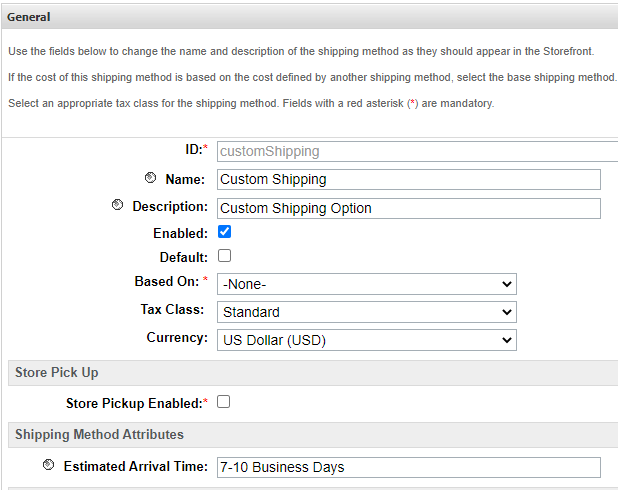
Let’s explain these fields a little bit. ID is something that will be used internally by SFCC to identify your shipping method. So, all you have to do here is make it unique.

custom shipping


The name field will be an actual field that will be displayed to customers during the checkout process.

custom shipping option


The description should be meaningful in order to help someone who might use it later understand what it is about. 

enabled default


Make sure to check Enabled to make it available. It is recommended that you create and customize your shipping method before doing that. As for default, it depends on your shipping method. If it is something your customers use often, then make it a default option to improve their experience on your website. 

based on


If you are creating a custom shipping option, you shouldn’t base it on any previous one because any change in base shipping option will also be reflected in your new custom one. If you choose not to put anything here, you will make your shipping option depending on other shipping options. 

tax class


As for the tax class, you will have an option for undefined if you are not yet sure which tax class should apply to this shipping method. Also, you can choose a standard tax class or choose an except option in case your shipping is exempt from taxation. If none of these fit your needs you can go to Merchant Tools >  Ordering >  Taxation - Tax Classes and add a new one. 

currency


For currency, you should use the one that is linked to the region for which you are using this shipping method. In case you have several countries with different currencies that you want to use this shipping method, the best option is to make different shipping methods (ones that differ by currency). 

store pickup


In case you offer in-store pickup then you can make that option available as well or you can make an entirely separate shipping method for that which would be a preferred option. By default shipping method 005 will be an in-store pickup for default currency, for some other currencies it will be currencyCode005 e.g. EUR005. Before you enable this make sure you have a store pickup cartridge added to your cartridge path.

estimated arrival


This field is important because what you type here it will be displayed to your customer when they see this shipment method. Try to give a short and meaningful estimate of the time of arrival for shipping time to improve customer experience.

Once you have entered all the information, press Apply and you will be presented with some additional options. 

For instance, you will be able to configure shipping costs depending on your needs. All you have to do is use the add button and specify a new shipping cost rule. 

shipping cost


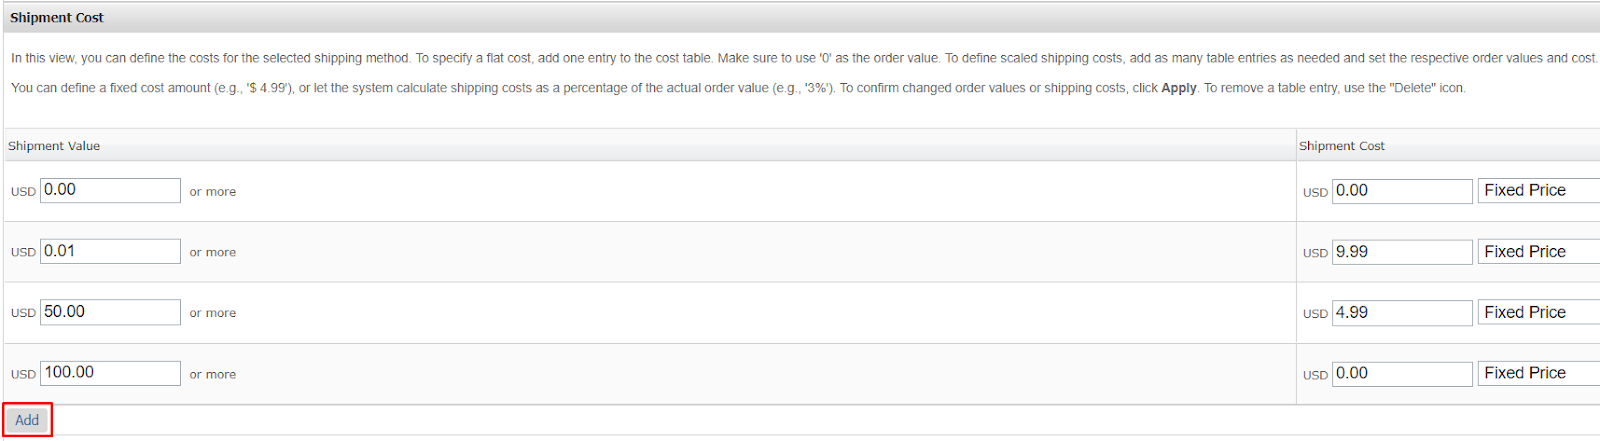
In this case, we have defined 4 rules for shipping. The first one says that if the basket is empty, its shipping cost will be zero. After that, we have defined several tiers of the shipping cost based on the basket value. In case there are less than $50 of products, then the shipping is $9.99. If there are products worth between $50 and $100 in the basket, then the shipping cost is $4.99 and if a customer has over $100 in his basket, then shipping is free. We don’t have to define the cost of shipping as a fixed price; it can also be a percentage value of the products that will be shipped. 

If we want to customize our shipping price even further, we can define specific rules on how we want our shipping to be determined. 


product fixed cost


For example, here we have specified that if a product with a certain ID is in the basket, then the price for shipping will be $4.99. That is a really simple rule but we could make it as complex as we want since we have all logical operators at our disposal here. As for qualifiers, we can take anything from category, ID, price, ATS, brand, price book, or even custom attributes that we have created. These qualifiers can help us make logical operations until we get the result we are after. 

Sometimes you might need to apply some additional cost to your base shipping price. 

product surcharge cost


This is used for the items that require special handling during shipping, signature fee, delivery on weekends, or some other reason why shipping might be more expensive. That is why in this example we have applied additional shipping cost to all the products from the electronics category. To make your own rule here just click on the new button. All the qualifiers we have talked about are available here as well. 

Keep in mind that this cost will be added after the basic shipping cost is determined. So, if your customer has an electronic product that costs less than $50 in his or her basket, the price of basic shipping will be $9.99 with an additional cost of $7.99 for a total of $17.98 for shipping. 


We might not want customers to use this method for some addresses and products. In that case, we can also configure this directly in Business Manager. 

exclusions


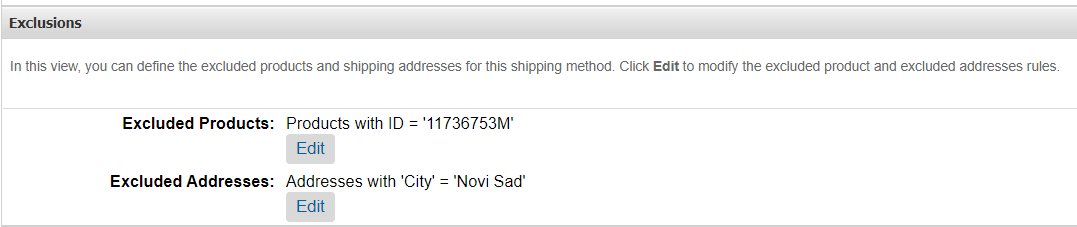
We can add as many of these rules as we need for our site or organization. Also, we can use any logical operators to achieve our goal and it can be as simple or as complex as we want it to be. When we are excluding products we don’t have to exclude just specific product IDs. We can also exclude products based on anything with a qualifier like category, ID, price, ATS, brand, or even some custom attributes. Excluding by address is also flexible as we can exclude by country, state, city,  postal code, building, or even specific address. The problem with exclusions is that we can know which product is excluded with a specific shipping method but we don’t know for what reason. This can cause issues if we need to display a message to our customers why certain products aren’t available for shipping to their location. In those cases, you will be forced to implement some custom logic to achieve that.

In the end, we can define which customer group this shipping method applies to, and only they will be able to see and use it. 

customer groups


Here you will be able to use any customer group that was defined on your site. In case you need to create your own for this purpose you can do so by going to Merchant Tools > Customers > Customer Groups and create your own customer group based on the rules you specify. 

In case you have defined a shipping method and it’s not showing up on the storefront, you have to check if you haven’t used a product, address, or a customer group that this shipping method doesn’t apply to. In that case, the customer will not be able to see this shipping method at all. Customers are always shown just available shipping methods based on their address and products in the basket. You should also be aware that in case you are using multi-currency sites and you have chosen a site that is in the currency of your shipping method or else it will not be shown at the checkout. 

select all


This will allow greater flexibility because you can easily copy a shipping method and change the currency for it, but, usually, it requires a little more fine-tuning. You should also note that when you copy a shipping method, the new one will have an ID that is an old_ID hyphen index number, it will also be in inactive status so you will have to enable it manually, while everything else will be the same. 

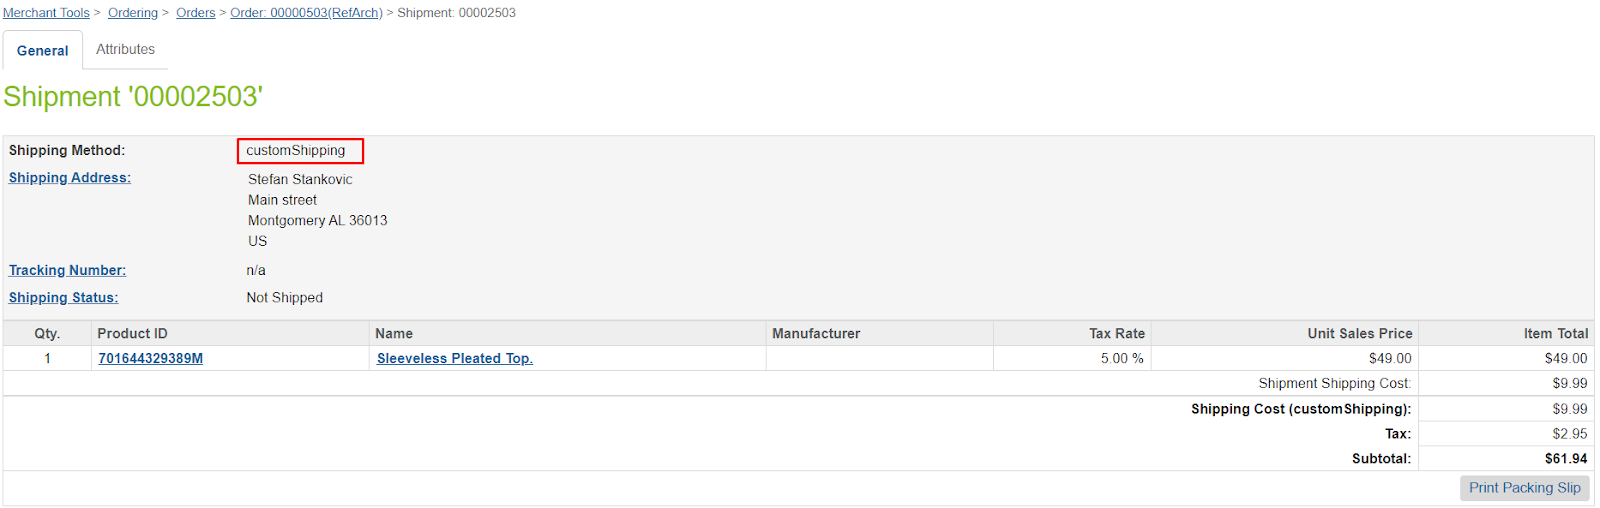
Now let us check how all of this would look on your storefront. In this example, we have a basket with less than $50 in total.  

custom shipping


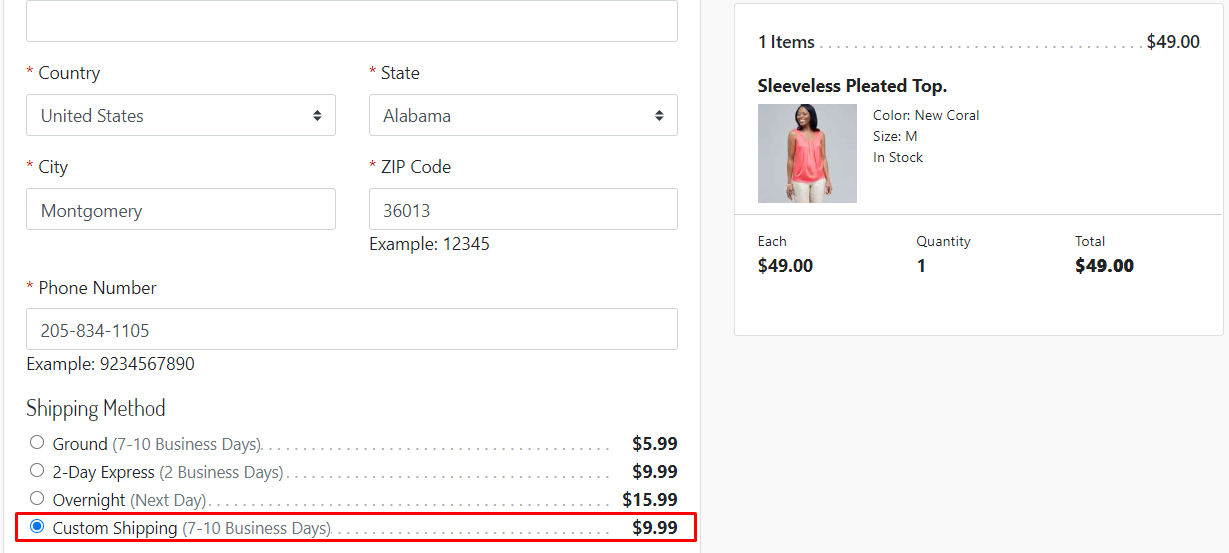
Since in your custom shipping method you have defined shipping cost based on the total value of the items in the basket, in this case we fall in the category below 50$ and that is why for our custom shipping method here the cost is $9.99. As you can see, it is very simple because once you have defined all the rules for our shipping method and enabled it, you can see it on our storefront right away, no custom coding required. 

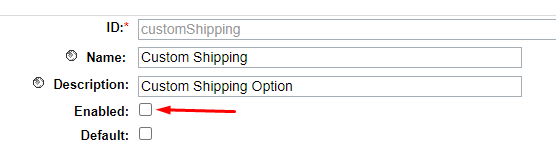
Sometimes you will also need to remove some outdated shipping methods so they don’t show up on your site. In case your organization plans to change them a little bit in the future you should choose to keep them but also disable them. You can do so by going to your shipping method in Merchant Tools >  Ordering >  Shipping Methods and untick enabled like in this image below. 

custom shipping


In your case, it might be different and you might be present with something like this.

custom shipping


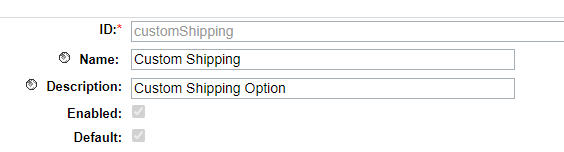
Now you are unable to change the status of your shipping method. But you can fix this easily. This just means your shipping method is the default one and you can’t disable a default shipping method until you assign some other shipping method as a default one. After you have done that you will be able to change the status of your shipping method as we did in the previous example. 

This might not be enough for you if you want to delete your shipping method completely. To do so you just need to select it and click on the delete button. 

shipping methods


After that, you will be shown a message that asks you whether you are sure you want to delete it. Click OK if you want to delete it, but keep in mind you will not be able to recover it after that. An option to bypass this is to save it offline by exporting it because you can upload it back at any time in the future or disable it until you need it again. If you want to delete a default shipping method you will get a message asking you if you are sure you want to delete it.  But if you click on OK, a new message will show up.

shipping methods


In other words, you must assign a default shipping method to some other shipping method if you want to delete it. You would be shown this message in case you tried to delete several shipping methods at once and only one of them was a default one, so keep that in mind as well. Each currency will have one default shipping method. 


Customize Your SFCC Payment Method to Suit Your Needs 

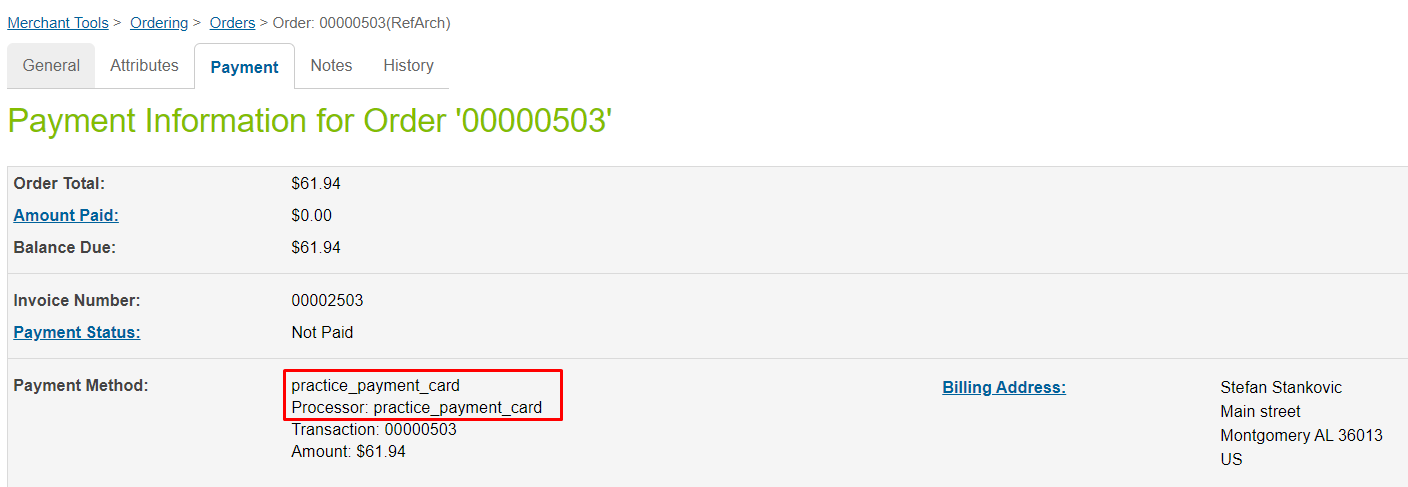
When you want to create a new method or manage the existing payment methods in SFCC you first have to go to Merchant Tools >  Ordering >  Payment Methods. To create a new payment method you have to click on a new button and enter at least ID, name, and choose a payment processor from a dropdown menu. For starters, we will create a simple payment method that uses a credit card processor so it will act the same as a regular credit card that is already present on your storefront. 

payment processor


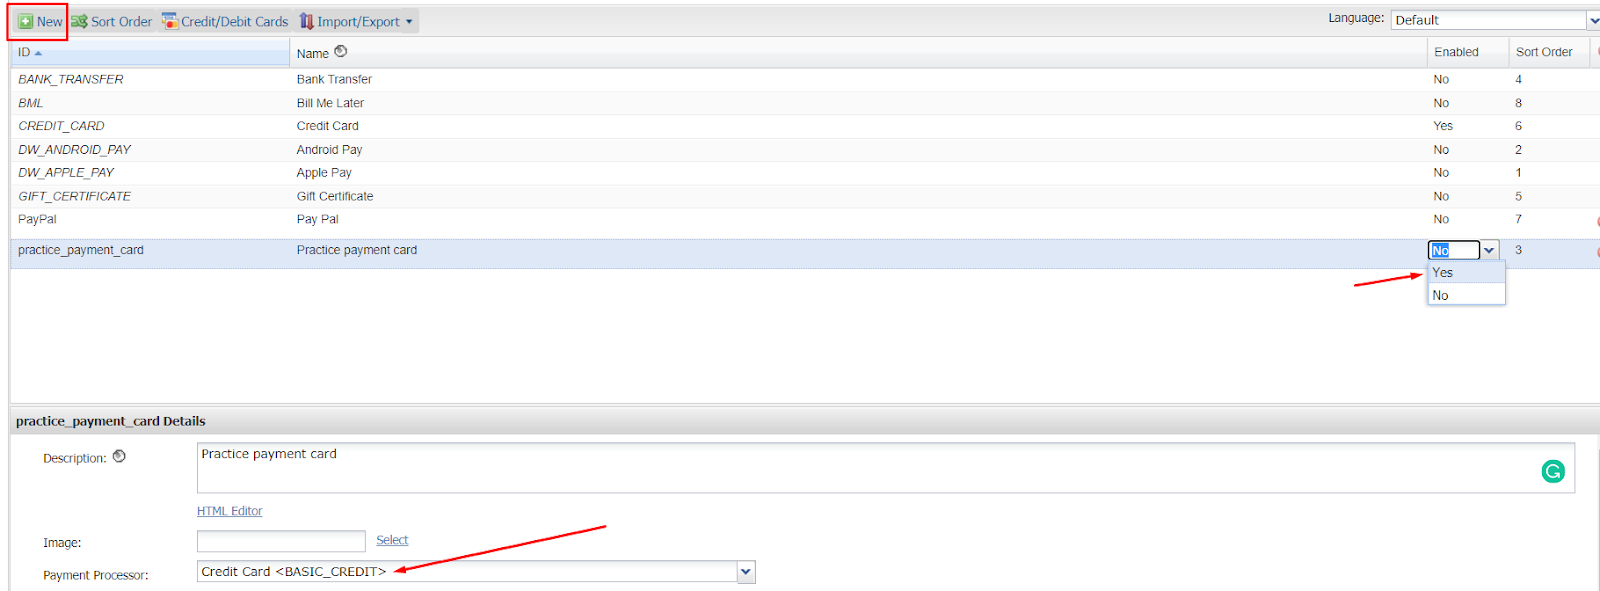
In the image, above you can see how that will look like in your business manager. Even when you have gone through these steps your payment method will not show up because you have to enable it. To do so click on No in column enabled and change it to Yes like shown above. Do so only when you are sure you have filled all the gaps with the information correctly. You should note that the name of your payment method will be used as alt text and the title on the frontend of your storefront. So make sure you give it a meaningful name unless you want to hardcode its name which should be avoided whenever possible.

We will now explore what each field in the payment method description means in more detail. This is what we have so far.

payment


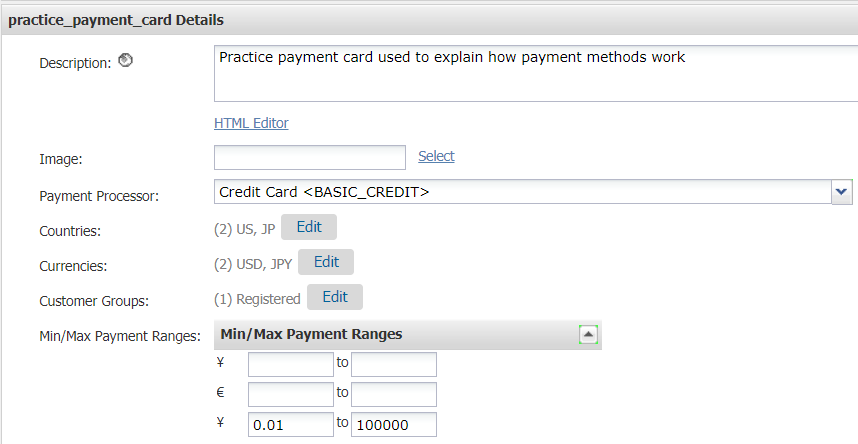
In the description field, we will enter a description of our payment method  In case someone else might choose to use it. The image field refers to the image we want our payment to be associated with at the frontend, but we can override this if we want to. Next, we have a payment processor that will process all the payments that come through this payment method. After that, we are able to configure restrictions that apply to this payment method. 

currency


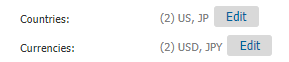
First, we can choose in which countries this payment method will be available, and, then, we can choose currencies this payment method will work in. 

customer group


For customer groups, we can also define what customer groups will be able to see this payment method. Finally, we have the option to configure payment ranges for this payment method with minimal and maximal payments that can be made using it. We can also leave these fields blank or configure them just for the chosen currencies. 

You might also want to change your payment processor, so let’s do that here as well. Go to Merchant Tools >  Ordering >  Payment Processors and create your payment processor. 

payment


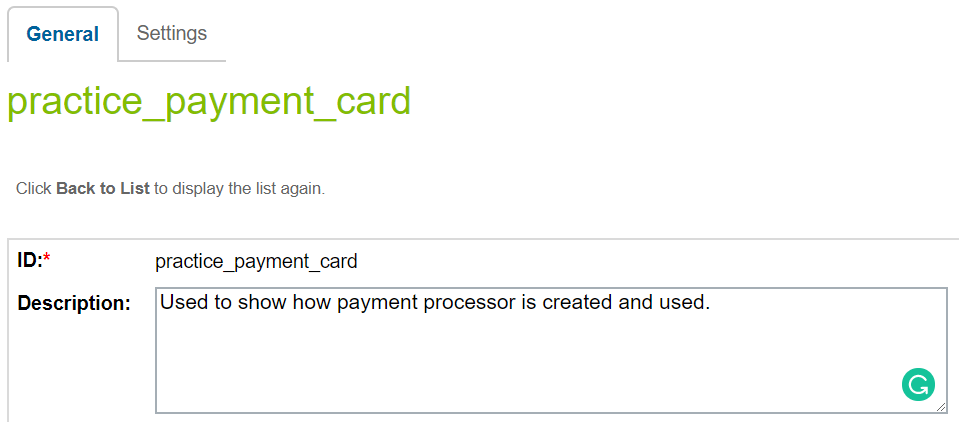
Once you are there click on the new button and fill in the gap with the information for ID and description for your processor. To make it available you have to click the apply button. In case you want to use the settings tab displayed here, you will first need to go to SitePreferences system object and add attributes to it. Here is how you would do that. 

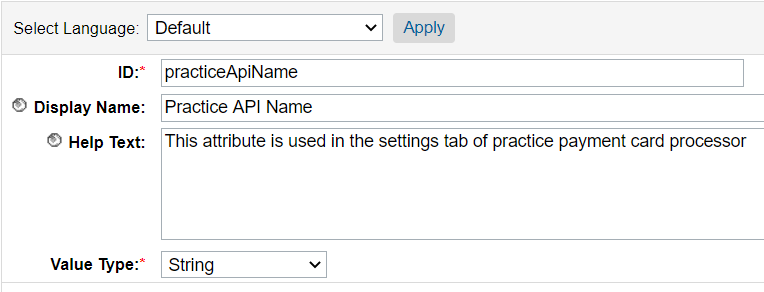
First, go to Administration >  Site Development >  System Object Types and click on the blue text that says Site Preferences. This will take you to the definition of that system object. Then, go to the attribute definitions tab and create two new definitions called practice API name and practice API password. Do that by clicking on the new button. Then you will be given details you need to put into the blank spaces. It will look something like this: 

payment


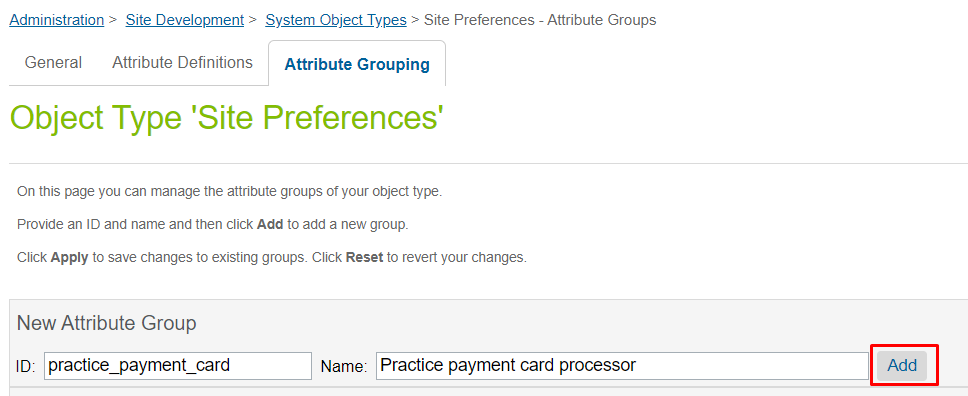
When you click on the apply button you will be asked to enter extra information if we want to. Once you have done that to both of our attributes we have to go to the Attribute groups tab on your system object and create a new attribute group named the same as your payment processor which in your case is practice_payment_card.

payment


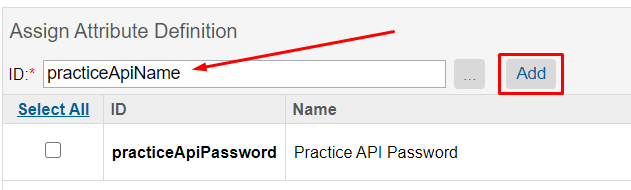
After you have done that, you need to add your attributes to your attribute group. You do that by simply going into your attribute group. Next you enter attribute definitions IDs and click on the add button.

payment


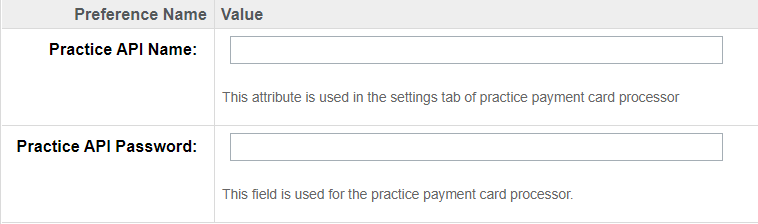
Once you have done all that you can go back to Merchant Tools >  Ordering >  Payment Processors and go to the settings tab. You will see the fields for it which you can fill in with that information.

preference


You would need this in case you are using some external payment processor. Then you would use this tab to enter your account information here. Like API name and password, private key, or some other information that would be used to associate a specific payment with your organization’s account. To get the information that was entered in these fields in code you would do something like this.


const sitePreferences : SitePreferences = dw.system.Site.getCurrent().getPreferences();

const practiceApiName : String = sitePreferences.getCustom()["practiceApiName"];

After that, you can use practiceApiName in any way you need to. 

Having created your own payment processor lets us add it to our payment method by changing the payment processor from Credit Card <BASIC_CREDIT> to our own that is practice_payment_card <practice_payment_card> like seen in our example. 

payment


Our goal is to create a credit card payment method but with our own payment processor. Still, we will make it behave in the same way as a regular credit card would. This exercise just shows us how we would do it on our own if we had to and it would also teach us a little bit more about how the checkout process works. 


What You Need to Do in the Backend

Let’s now focus on what we have to change in the backend and frontend to make all of this work on your storefront. Right now, if you added a product to your basket and went through the checkout process, your payment method wouldn’t show up.

To make this process work you will have to go through several steps. Let us start with the backend part by creating a hook that will check if all the information required for billing is entered. To do so you first must create the following path: .../cartridge/scripts/hooks/payment/processor/ in your cartridge, if it doesn’t already exist. Now you will have to create a file that has the same name as your payment processor plus _form_processor, in our case it will be practice_payment_card_form_processor.jsThen we will check if all the required information is provided to us by using the following logic:

'use strict';

/**

 * Verifies the required information for billing form is provided.

 * @param {Object} req - The request object

 * @param {Object} paymentForm - the payment form

 * @param {Object} viewFormData - object contains billing form data

 * @returns {Object} an object that has error information or payment information

 */

function processForm(req, paymentForm, viewFormData) {

    viewFormData.paymentMethod = {

        value: paymentForm.paymentMethod.value,

        htmlName: paymentForm.paymentMethod.value

    };


    viewFormData.paymentInformation = {

        cardType: {

            value: paymentForm.creditCardFields.cardType.value,

            htmlName: paymentForm.creditCardFields.cardType.htmlName

        },

        cardNumber: {

            value: paymentForm.creditCardFields.cardNumber.value,

            htmlName: paymentForm.creditCardFields.cardNumber.htmlName

        },

        securityCode: {

            value: paymentForm.creditCardFields.securityCode.value,

htmlName: paymentForm.creditCardFields.securityCode.htmlName

        },

        expirationMonth: {

            value: parseInt(paymentForm.creditCardFields.expirationMonth.selectedOption, 10),

            htmlName: paymentForm.creditCardFields.expirationMonth.htmlName

        },

        expirationYear: {

            value: parseInt(paymentForm.creditCardFields.expirationYear.value, 10),

            htmlName: paymentForm.creditCardFields.expirationYear.htmlName

        }

    }


    if (req.form.storedPaymentUUID) {

        viewData.storedPaymentUUID = req.form.storedPaymentUUID;

    }


    viewData.saveCard = paymentForm.creditCardFields.saveCard.checked;


    // process payment information

    if (viewData.storedPaymentUUID

        && req.currentCustomer.raw.authenticated

        && req.currentCustomer.raw.registered

    ) {

        let paymentInstruments = req.currentCustomer.wallet.paymentInstruments;

        let paymentInstrument = array.find(paymentInstruments, function (item) {

            return viewData.storedPaymentUUID === item.UUID;

        });

viewData.paymentInformation.cardNumber.value = paymentInstrument.creditCardNumber;

        viewData.paymentInformation.cardType.value = paymentInstrument.creditCardType;

        viewData.paymentInformation.securityCode.value = req.form.securityCode;

        viewData.paymentInformation.expirationMonth.value = paymentInstrument.creditCardExpirationMonth;

        viewData.paymentInformation.expirationYear.value = paymentInstrument.creditCardExpirationYear;

        viewData.paymentInformation.creditCardToken = paymentInstrument.raw.creditCardToken;

    }

    return {

        error: false,

        viewData: viewFormData

    };

}

exports.processForm = processForm;

This step will verify that your customer has entered all the necessary information into the fields you will create for your own credit card.

Once you have done this you will make a new file in the same folder with the same name as our payment processor. If you have been following our example, then this would be practice_payment_card.js.

In this js file, you will check if all the information that was entered is a valid credit card and then it will create a credit card payment instrument and add it to the basket. It will also authorize the payment with your credit card. 

'use strict';


const Transaction = require('dw/system/Transaction');


/**

 * Creates a token. This should be replaced by utilizing a tokenization provider

 * @returns {string} a token

 */

function createToken() {

    return Math.random().toString(36).substr(2);

}


/**

 * Verifies that entered credit card information is a valid card. If the information is valid a

 * credit card payment instrument is created

 * @param {dw.order.Basket} basket Current users's basket

 * @param {Object} paymentInformation - the payment information

 * @return {Object} returns an error object

 */

function Handle(basket, paymentInformation) {

    const collections = require('*/cartridge/scripts/util/collections');


    let currentBasket = basket;

    let cardErrors = {};

    let cardNumber = paymentInformation.cardNumber.value;

    let cardSecurityCode = paymentInformation.securityCode.value;

    let expirationMonth = paymentInformation.expirationMonth.value;

    let expirationYear = paymentInformation.expirationYear.value;

    let serverErrors = [];

    let creditCardStatus;


    let cardType = paymentInformation.cardType.value;

    let paymentCard = PaymentMgr.getPaymentCard(cardType);


    if (!paymentInformation.creditCardToken) {

        if (paymentCard) {

            creditCardStatus = paymentCard.verify(

                expirationMonth,

                expirationYear,

                cardNumber,

                cardSecurityCode

            );

        } else {

            cardErrors[paymentInformation.cardNumber.htmlName] =

                Resource.msg('error.invalid.card.number', 'creditCard', null);


            return { fieldErrors: [cardErrors], serverErrors: serverErrors, error: true };

        }


        if (creditCardStatus.error) {

            collections.forEach(creditCardStatus.items, function (item) {

                switch (item.code) {

                    case PaymentStatusCodes.CREDITCARD_INVALID_CARD_NUMBER:

                        cardErrors[paymentInformation.cardNumber.htmlName] =

                            Resource.msg('error.invalid.card.number', 'creditCard', null);

                        break;


                    case PaymentStatusCodes.CREDITCARD_INVALID_EXPIRATION_DATE:

                        cardErrors[paymentInformation.expirationMonth.htmlName] =

                            Resource.msg('error.expired.credit.card', 'creditCard', null);

                        cardErrors[paymentInformation.expirationYear.htmlName] =

                            Resource.msg('error.expired.credit.card', 'creditCard', null);

                        break;


                    case PaymentStatusCodes.CREDITCARD_INVALID_SECURITY_CODE:

                        cardErrors[paymentInformation.securityCode.htmlName] =

                            Resource.msg('error.invalid.security.code', 'creditCard', null);

                        break;

                    default:

                        serverErrors.push(Resource.msg('error.card.information.error', 'creditCard', null));

                }

            });


            return { fieldErrors: [cardErrors], serverErrors: serverErrors, error: true };

        }

    }


    Transaction.wrap(function () {

        let paymentInstruments = currentBasket.getPaymentInstruments(

            'practice_payment_card'

        );


        collections.forEach(paymentInstruments, function (item) {

            currentBasket.removePaymentInstrument(item);

        });


        let paymentInstrument = currentBasket.createPaymentInstrument(

            'practice_payment_card', currentBasket.totalGrossPrice

        );


        paymentInstrument.setCreditCardHolder(currentBasket.billingAddress.fullName);

        paymentInstrument.setCreditCardNumber(paymentInformation.cardNumber.value);

        paymentInstrument.setCreditCardType(paymentInformation.cardType.value);

        paymentInstrument.setCreditCardExpirationMonth(paymentInformation.expirationMonth.value);

        paymentInstrument.setCreditCardExpirationYear(paymentInformation.expirationYear.value);

        paymentInstrument.setCreditCardToken(

            paymentInformation.creditCardToken

                ? paymentInformation.creditCardToken

                : createToken()

        );

    });


    return { fieldErrors: null, serverErrors: null, error: false };

}


/**

 * Authorizes a payment using a credit card. Customizations may use other processors and custom

 *      logic to authorize credit card payment.

 * @param {number} orderNumber - The current order's number

 * @param {dw.order.PaymentInstrument} paymentInstrument -  The payment instrument to authorize

 * @param {dw.order.PaymentProcessor} paymentProcessor -  The payment processor of the current

 *      payment method

 * @return {Object} returns an error object

 */

function Authorize(orderNumber, paymentInstrument, paymentProcessor) {

    const Resource = require('dw/web/Resource');


    let serverErrors = [];

    let fieldErrors = {};

    let error = false;


    try {

        Transaction.wrap(function () {

            paymentInstrument.paymentTransaction.setTransactionID(orderNumber);

            paymentInstrument.paymentTransaction.setPaymentProcessor(paymentProcessor);

        });

    } catch (e) {

        error = true;

        serverErrors.push(

            Resource.msg('error.technical', 'checkout', null)

        );

    }


    return { fieldErrors: fieldErrors, serverErrors: serverErrors, error: error };

}


exports.Handle = Handle;

exports.Authorize = Authorize;

exports.createToken = createToken;

Keep in mind that you have to export these functions at the end or else they won’t be visible. All of this wasn’t created from scratch and you can see that by checking these files in the same location in the base cartridge. This is the theme you will notice in this entire code as we need these functions to behave just a little bit differently than they already do. 

Just making these hooks won’t make them available. We have to register them as well in order for the system to be able to see them. We do that in two steps: first by creating a hooks.json in the root of your cartridge. To help you understand where everything is more easily we’ll show you its position inside our cartridge. 

payment


It will be at the same level as your package.json for that cartridge if you are having trouble determining where it should go. In this file, we will define what script needs to be called for what extension point.

{

    "hooks": [

        {

            "name": "app.payment.processor.practice_payment_card",

            "script": "./cartridge/scripts/hooks/payment/processor/practice_payment_card"

        },

        {

            "name": "app.payment.form.processor.practice_payment_card",

            "script": "./cartridge/scripts/hooks/payment/processor/practice_payment_card_form_processor"

        }

    ]

}

We can see here that inside the hooks we have the name of our hook and it’s location. The second step: don’t forget to register hooks.json in your package.json file that will also be at the root of your cartridge folder. You register your hooks in the following way. 

{

    "hooks": "./hooks.json"

}

With these custom hooks, we have created extension points that our system can use. 

After you have done all of that your hooks have been registered and can be used. At this point, we have completed a good part of making our custom payment method available in the storefront, and we only have to make it available in the frontend as well. 


How to Make our Work Visible

Our goal is to make the frontend more dynamic. Right now just one payment method will be displayed which is defined in the payment options template. We are going to change that to make all the available payment options visible. If you don’t have .../templates/default/checkout/billing/paymentOptions/ in your cartridge create folders that are missing in your templates folder. At the end of this chapter, this is what you should have in that folder.

templates


Now, create a creditCardContent.isml in the payment options folder and we will need the following code inside it.


<!--- applicable credit cards--->

<div class="tab-pane ${'credit-card-content-' + paymentOption.ID} ${loopstatus.first ? ' active' : ''}"

    id="${'credit-card-content-' + paymentOption.ID}" role="tabpanel">

    <fieldset class="payment-form-fields">


        <!--- payment method is credit card --->

        <input type="hidden" class="form-control"

            name="${pdict.forms.billingForm.paymentMethod.htmlName}"

            value="${paymentOption.ID}">


        <!--- register/authenticated user --->

        <isif condition="${pdict.customer.registeredUser}">

            <div

                class="user-payment-instruments container ${pdict.customer.registeredUser && pdict.customer.customerPaymentInstruments.length ? '' : 'checkout-hidden'}">

                <!--- Stored user payments --->

                <div class="stored-payments">

                    <isinclude template="checkout/billing/storedPaymentInstruments" />

                </div>


                <!--- Add new payment card button --->

                <div class="row">

                    <button class="btn btn-block add-payment btn-outline-primary" type="button">${Resource.msg('button.add.payment', 'checkout', null)}</button>

                </div>

            </div>

        </isif>


        <fieldset class="credit-card-form ${pdict.customer.registeredUser && pdict.customer.customerPaymentInstruments.length ? 'checkout-hidden' : ''}">

            <isinclude template="checkout/billing/creditCardForm" />

            <isif condition="${pdict.customer.registeredUser}">

                <button

                    class="btn btn-block cancel-new-payment btn-outline-primary ${pdict.customer.registeredUser && pdict.customer.customerPaymentInstruments.length ? '' : 'checkout-hidden'}"

                    type="button">${Resource.msg('button.back.to.stored.payments', 'checkout', null)}</button>

            </isif>

        </fieldset>


    </fieldset>

</div>

We are now going to assign the file’s ID dynamically based on its actual ID and it won’t be hardcoded in this ISML file. Also, the same thing was done for the payment methods name. Unfortunately, we can’t extend an ISML file so that is why we had to copy most of the original file in order to override it. That will happen often in this frontend part due to this limitation. 

We have to override some other templates that are called during the checkout process. If you want to find out which ones are used, check out the storefront toolkit while you are in the checkout process and use the page information to see what templates are called to render certain parts of the page. It will help you a lot on your journey towards understanding how it all works and fits together. Let us now create a file called creditCardTab.isml in the same folder as this is the actual tab in which information about our payment method will be displayed. 

<li class="nav-item" data-method-id="${paymentOption.ID}">

    <isscript>

        let classForCardTab = 'nav-link credit-card-tab' + (loopstatus.first ? ' active' : '');

    </isscript>

    <a class="${classForCardTab}" data-toggle="tab" href="${'#credit-card-content-' + paymentOption.ID}" role="tab">

        <img class="credit-card-option"

                src="${URLUtils.staticURL('/images/credit.png')}"

                height="32"

                alt="${paymentOption.name}"

                title="${paymentOption.name}"

        >

    </a>

</li>

As you can see here, we are just defining what the payment options ID is, an icon that will be displayed on that tab as well as alt and title text. 

The next three files we will make will allow our payment method to use these templates that we have made. First, we will create paymentOptionsContent.isml in the same folder as the others.

<isloop items="${pdict.order.billing.payment.applicablePaymentMethods}" var="paymentOption" status="loopstatus">

    <isif condition="${paymentOption.ID === 'CREDIT_CARD' || paymentOption.ID === 'practice_payment_card'}">

        <isinclude template="checkout/billing/paymentOptions/creditCardContent" />

    </isif>

</isloop>

We have just made an additional check in case our payment method is practice_payment_card. After that, we will create another file called  paymentOptionsTabs.isml and it will contain this code. 

<isloop items="${pdict.order.billing.payment.applicablePaymentMethods}" var="paymentOption" status="loopstatus">

    <isif condition="${paymentOption.ID === 'CREDIT_CARD' || paymentOption.ID === 'practice_payment_card'}">

        <isinclude template="checkout/billing/paymentOptions/creditCardTab" />

    </isif>

</isloop>

We have the same thing as in the previous file just a simple check for our own payment method as we will do in paymentOptionsSummary.isml, which we will also need to create.

<div class="payment-details">

    <isloop items="${pdict.order.billing.payment.selectedPaymentInstruments}" var="payment">

        <isif condition="${paymentOption.ID === 'CREDIT_CARD' || paymentOption.ID === 'practice_payment_card'}">

            <isinclude template="checkout/billing/paymentOptions/creditCardSummary" />

        </isif>

    </isloop>

</div>

This will allow us to see a receipt on the thank you page with our payment information. 


What we have to do to make it work is to update our client javascript files that are associated with the part of the checkout process we are interested in. For this part, I won’t be posting the entire code since, in SFCC, we can’t extend client javascript so it doesn’t make sense to copy a long piece of code. What you should do is look at .../client/default/js/checkout.js and copy it to your cartridge in the same location as in the base cartridge. At each instance where it checks if it is CREDIT_CARD, you should add an additional check for your payment method. See the example below:

if ($('.payment-information').data('payment-method-id') === 'CREDIT_CARD'

                        || $('.payment-information').data('payment-method-id') === 'practice_payment_card')

Do this at every place where there is such a check inside checkout.js file. This is done so that your payment method is not discarded at the frontend of your storefront because this way you are saying that it is also allowed that a payment method has an ID as your payment method. Then you should look at the base .../client/default/js/billing.js and copy just the updatePaymentInformation function. Again, at every place where there is a check for a payment method, add one for your custom payment method as well. In this way, you will make sure that after your payment method has been verified your customer will be able to see some basic information about their payment. In this case, customers will be able to see credit card type, their masked credit card number as well as the expiration date of their credit card. Now your checkout folder will look like this:

cartridge app


After you have done all of that make sure to compile your javascript with command npm run compile:js in your terminal. Ensure that you are positioned inside your cartridge when you run that command because that is where your package.json with all the scripts and dependencies is supposed to be. If js code it’s not showing up on your storefront, you need to make sure everything is where it is supposed to be by checking the static folder which will have your js files compiled. 

After you have done all of that you can go through the checkout process where we will be presented with our custom payment method. After filling in all the information correctly you can pay for your order using the custom payment method and our custom shipping method. After we press the place order button we will be presented with a thank you page and a receipt for our payment. 

From the receipt, we can see that our shipping method is indeed our custom shipping method and we can also see some information about shipping and billing addresses. 

To make sure our order was processed correctly we should go to Merchant Tools >  Ordering >  Orders and find our order or use order number from receipt to find it. Once we are in the order, we go to the Payment tab to see if it was processed using our payment method. 

payment


In this tab, we can make sure that our payment method has indeed been used and that our payment processor was used for processing in this order. 

shipment


Now, if we go back to the general tab and check out the details about shipping, we can see order shipment information. We can confirm that our custom shipping method was used for shipping as well as its cost for this particular order.


Lessons Learned 

When you are talking about shipment and payment options you can’t rely on one-size-fits-all philosophy. In an eCommerce business, your job is to know your customer’s needs and wants so you can make their experience with your services as smooth as possible. That will make them want to use your services again and again. We can also talk about the price since using some shipping or payment options might be cheaper for you and easier for your customers. Another important concern in today’s world is security. Even with your site being secure, people might perceive certain payment options to be safer than others. If you look at all these benefits that custom shipping and payment options can bring to your business, it should be obvious why it’s in your own interest to implement them. What makes it even more appealing is that they are not that hard to implement as you have seen in our example here. So don’t wait, go ahead, and improve your customer experience right away!