Creating a breakout custom attribute editor in Page Designer for Salesforce Commerce Cloud (SFCC)

How to implement a custom attribute editor in Salesforce Commerce Cloud? This is what we will focus on in this article.

The next logical question would be “Why do I need to implement a custom attribute editor in SFCC?”. Well, the answer is quite simple. If your storefront website needs a component that doesn’t have a predefined Page Designer type, implementing a custom attribute editor is the way to go.

In most cases, the requirements for a custom attribute editor include a UI that doesn’t have any room on the standard overlay that you have on the right side of the Page Designer when picking a component. This is why I will try to explain how to make a Breakout type custom editor. Breakout type in this case will be a popup that comes out in a separate window inside PD.

PREREQUISITES:


1.  Page Designer enabled in your storefront Business Manager (described in the first blog about Page Designer)

2.  Setup workspace in VSCode or Eclipse


Implementing a breakout editor involves these high-level steps:


1.  Create server-side meta definition and script files for the trigger editor and the breakout editor

2.  In the script file for the trigger editor, define the breakout editor as a dependency

3.  Develop client-side UI code that implements the trigger and breakout editors, opens and closes the breakout modal window, and passes a value from the breakout editor to the trigger editor to Page Designer when the merchant clicks Apply


Anatomy

As in the previous blog, it’s important to keep the project hierarchy clean, so that you have a better overview of the entire project but also your key files. Make sure it looks like this, especially the js and CSS files for the editors, as Page Designer will search for them only in the static folder of your cartridge.

sfcc


The difference between productBannerStrip.json file in this blog and the previous one is the definition of your trigger editor. Keep in mind that he will be the one instantiating the Breakout Editor of Page Designer.

{
  "id": "customCarEditor",
    "name": "Custom Car Editor",
    "type": "custom",
    "required": true,
    "editor_definition": {
        "type": "com.sfcc.customCarEditorTrigger",
        "configuration": {
            "options": {
                "config": [
                    "Yugo",
                    "Golf",
                    "Mercedes"
                ]
            }
        }
    }
}

Add this snippet of the code to the above mentioned file in attribute_definitions array.


Server-side meta definition and script files

Let’s start with custom trigger editor definition and script files.

We need a customCarEditorTrigger.json

{
    "name": "Car Custom Editor",
    "description": "Custom editor with car picker breakout functionality!",
    "resources": {
        "scripts": [
            "https://cdnjs.cloudflare.com/ajax/libs/jquery/3.4.0/jquery.min.js",
            "/experience/editors/com/sfcc/customCarEditorTriggerScript.js"
        ],
        "styles": [     "https://cdnjs.cloudflare.com/ajax/libs/design-system/2.8.3/styles/salesforce-lightning-design-system.min.css",
            "/experience/editors/com/sfcc/customCarEditorTriggerCSS.css"
        ]
    }
}

scripts array parameter represents included jQuery and a js script for the client-side of your editor. Make sure that the js file is inside the static folder of your cartridge.

styles array parameter represents the default CSS by the sfcc and a customized CSS file, which also needs to be put inside the static folder of your cartridge.

Next, we need a customCarEditorTrigger.js. This is the server-side script for your custom trigger.

'use strict';

var HashMap = require('dw/util/HashMap');
var Resource = require('dw/web/Resource');
var PageMgr = require('dw/experience/PageMgr');

module.exports.init = function (editor) {
    // Default values properties
    var defaults = {
        buttonBreakout: 'Select',
        titleBreakout: 'Cars',
        placeholder: 'Select your custom car',
        description: 'Description of Custom Car Editor',
        group1: 'car group1 configuration'
    };

    // Add some localizations
    var localization = Object.keys(defaults).reduce(function (acc, key) {
        acc.put(key, Resource.msg(key, 'experience.editors.com.sfcc.customCarEditorTrigger', defaults[key]));
        return acc;
    }, new HashMap());
    editor.configuration.put('localization', localization);

    // Pass through property `options.config` from the `attribute_definition` to be used in a breakout editor
    var options = new HashMap();
    options.put('config', editor.configuration.options.config);

    // Create a configuration for a custom editor to be displayed in a modal breakout dialog (breakout editor)
    var breakoutEditorConfig = new HashMap();
    breakoutEditorConfig.put('localization', localization);
    breakoutEditorConfig.put('options', options);

    // Add a dependency to the configured breakout editor
    var breakoutEditor = PageMgr.getCustomEditor('com.sfcc.customCarEditorBreakout', breakoutEditorConfig);
    editor.dependencies.put('customCarEditorBreakoutScript', breakoutEditor);
};

Above each piece of code, I have added comments which could be helpful in understanding how the entire solution works.


Now we move on to the breakout part of the editor server-side script and meta definition. Again, we first start with a meta description.

customCarEditorBreakout.json

{
    "name": "Custom Car Editor Breakout",
    "description": "An car editor with breakout functionality",
    "resources": {
        "scripts": [
            "https://cdnjs.cloudflare.com/ajax/libs/jquery/3.4.0/jquery.min.js",
            "/experience/editors/com/sfcc/customCarEditorBreakoutScript.js"
        ],
        "styles":[
"https://cdnjs.cloudflare.com/ajax/libs/design-system/2.9.4/styles/salesforce-lightning-design-system.min.css",
            "/experience/editors/com/sfcc/customCarEditorBreakoutCSS.css"
        ]
    }
}

The same as in trigger editor, scripts file and style file need to be placed in the static folder of your cartridge.

To finish up the meta file we need a script, as always :) Go ahead and add customCarEditorBreakout.js

'use strict';
var URLUtils = require('dw/web/URLUtils');

module.exports.init = function (editor) {
    var optionsConfig = editor.configuration.options.config;
    var optionsInit = [
        'Yugo',
        'Fiat'
    ];

    // Init editor configuration
    editor.configuration.options.put('init', optionsInit);

    // Provide `baseUrl` to the static assets/content
    editor.configuration.put('baseUrl', URLUtils.staticURL('/experience/editors/com/sfcc/').https().toString());
};

Before we move on to client-side scripts and styles, make sure that you have added your app cartridge to the Business Manager cartridge path. Otherwise, Page Designer won’t be able to see your config and script files.

Starting with trigger editor client-side script:

Once the editor is ready, a `sfcc:breakout` event is sent. Usually, this happens when a user clicks on a certain <button> or interacts with the trigger editor in some way.

When the breakout is closed (either programmatically, or via the built-in action <button>s), the callback is invoked, containing information about the "type" of the action that caused the invocation.

A breakout can be closed with the intent to either "Cancel" or "Apply" an editing process. The intent can be derived from the "type" information that comes as a part of the callback response (either `sfcc:breakoutCancel` or `sfcc:breakoutApply`).

In case of an "Apply" intent will also include a "value" available as a part of the response, reflecting the value that was the last set via `sfcc:value` in the breakout editor.


handleBreakoutOpen() - The user interacted with the <button> and the triggering editor requests that Page Designer opens a breakout on its behalf using an editor ID. This ID refers to the key under which an editor has been put into the "dependencies" key-value store of the triggering editor's configuration. A callback is provided along with the event emission to be invoked once the breakout editor gets closed.

customCarEditorTriggerScript.js

// Code in the client-side JavaScript file for the trigger editor
(() => {
    subscribe('sfcc:ready', () => {

        var template = "<div><p>Open car picker editor</p> <button  id='breakout-trigger'>Open Car Picker</button></div>";
        $.append(template);
        var openButtonEl = $('#breakout-trigger');
        openButtonEl.on('click', handleBreakoutOpen);
    });

    function handleBreakoutOpen() {
        emit({
            type: 'sfcc:breakout',
            payload: {
                id: 'customCarEditorBreakoutScript',
                title: 'The title to be displayed in the modal'
            }
        }, handleBreakoutClose);
    }

    function handleBreakoutClose({ type, value }) {
        // Now the "value" can be passed back to Page Designer
        if (type === 'sfcc:breakoutApply') {
            handleBreakoutApply(value);
        } else {
            handleBreakoutCancel();
        }
    }

    function handleBreakoutCancel() {
        // left empty in case you want to do more customization on this event
    }

    function handleBreakoutApply(value) {
        // Emit value update to Page Designer host application
        emit({
            type: 'sfcc:value',
            payload: value
        });
    }
})();

Now for the breakout part we have a customCarEditorBreakoutScript.js

// Code in the client-side JavaScript file for the breakout editor
(() => {
    subscribe('sfcc:ready', () => {
        // Once the breakout editor is ready, the custom code is able to select or
        // Create a value. Any meaningful change to a value/selection needs to be
        // reflected back into the host container via a `sfcc:value` event.
        const template = document.createElement('template');
        template.innerHTML = "<div><p>Yugo</p><p>Mercedes</p><p>BMW</p><p>Seat</p></div>";
        const clone = document.importNode(template.content, true);
        document.body.appendChild(clone);
        const openButtonEl = document.querySelector('p');
        openButtonEl.addEventListener('click', handleSelect);
    });

    function handleSelect({ target }) {
        // The value changed and the breakout editor's host is informed about the
        // value update via a `sfcc:value` event.
        const selectedValue = target.innerText;
        emit({
            type: 'sfcc:value',
            payload: selectedValue ? { value: selectedValue } : null
        });
    }
})();

Since I’ve mentioned a lot of events that go between the JS files of breakout and trigger, it’s only fair to explain what those Event Types actually mean.


Each custom attribute editor is wrapped in a host component that contains an HTML iframe element. The iframe encapsulates the code and the styling of the editor and represents a self-contained sandbox environment in which the editor runs so that different custom attribute editors on the same page don't interfere with each other. The host and the custom attribute editor in the iframe communicate by passing events back and forth on a special messaging channel.

Two main methods are in charge of communicating in this way.

subscribe() - Subscribes to events sent from the host to the editor. You can subscribe for a certain event type and when that event is sent from the host, a callback that uses a payload and optional context is invoked.

emit() - Sends events from the editor to the host.


Having this in mind, let’s split Host’s events and custom attribute editor’s events.


Host’s Events

sfcc:ready - The custom attribute editor is initialized. All the scripts and styles have been loaded into the editor's environment. When the host emits this event, it doesn't necessarily mean that all synchronously loaded assets and code have finished loading. For some components, you might need to manually listen to browser events, such as load or DOMContentLoaded, to get more information. The sfcc:ready event includes information required to display the editor, such as initial value, configuration data, data locale, display locale, and initial validity.

sfcc:value -The value of the attribute. Not sent on the initial load. Sent only when the value changes because of external modifications.

sfcc:required - Indicates whether this attribute is required. Not sent on the initial load. Sent only when the required status changes after the initialization ready phase. The custom attribute editor might use this information to display certain styling or indicators in the editor.

sfcc:disabled - Indicates whether this attribute is disabled. Not sent on the initial load. Sent only when the disabled status changes after the initialization ready phase. The custom attribute editor might use this information to render elements differently or display certain styling or indicators in the editor.

sfcc:valid - Indicates whether the value of the attribute is valid. Not sent on the initial load. Sent only when the validity status changes after the initialization ready phase.


Events Emitted by the Custom Attribute Editor

sfcc:value - The value of the attribute. Sent when the value changes inside the editor. Page Designer requires that the value is a plain JavaScript object.

sfcc:valid - Indicates whether the value of the attribute is valid. Can include an error message.

sfcc:interacted - Indicates that the user has interacted with the custom attribute editor. The editor is implicitly marked as interacted when it is blurred. For example, when the editor's contentWindow loses focus. Page Designer supports an interacted (or touched) state for form elements. This state marks a field that a user has already interacted with, for example, by tabbing through it. Being able to mark a field as touched allows for error messages in forms to be hidden initially and only displayed for fields with which a user has interacted.

Ok, let's see what our custom trigger editor looks now and what it does:

asdasas


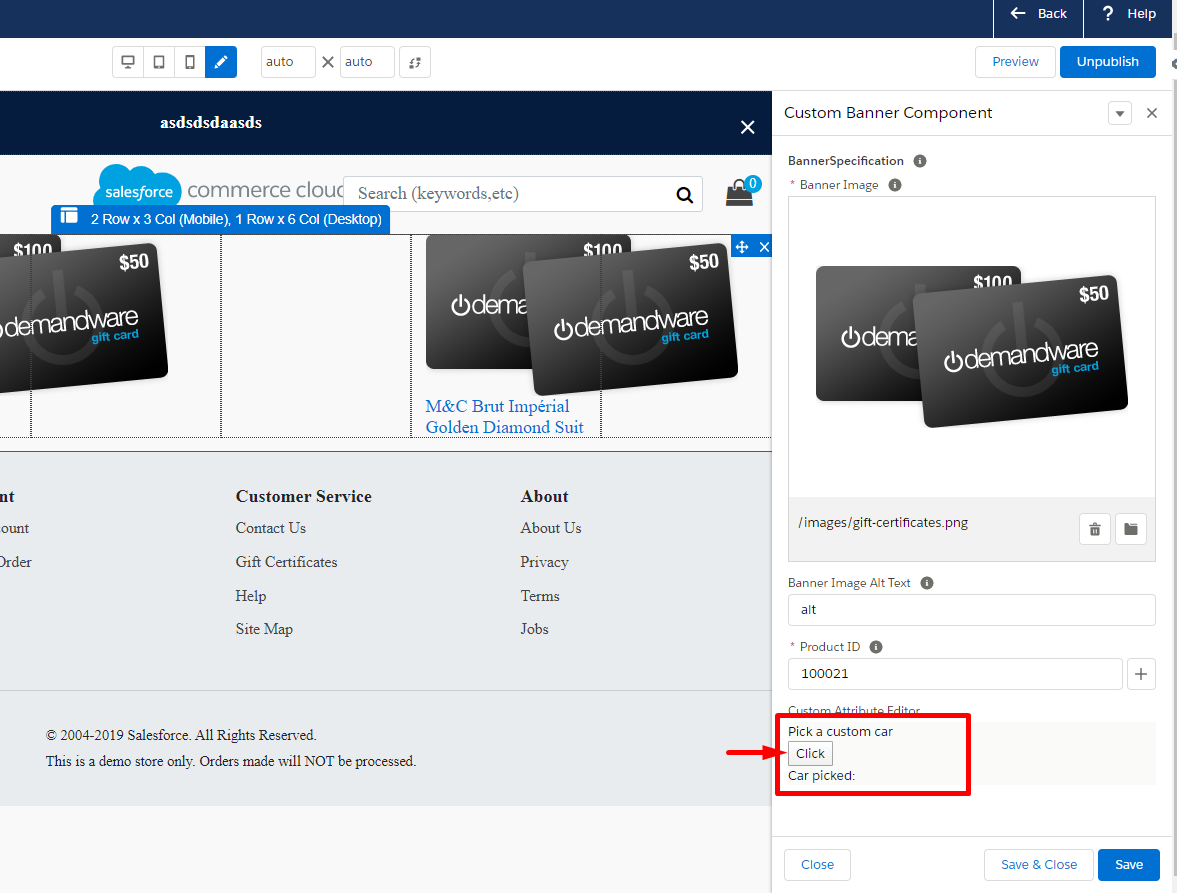
By opening your breakout editor you should be able to see the popup :

cat picker


Now, by selecting one of the cars, and clicking on the Apply button, your breakout should close. In code, the return value is a printed out JSON of an object you selected so that it makes more sense to you.

Be mindful that this is a simple JS with a simple example of picking value, so you can make your trigger and breakout as complex as your JS/CSS skills allow you to.


FINAL WORDS

Page Designer is a powerful tool that allows you to implement the most advanced solution that will meet your customer's needs. It gives you freedom regarding encapsulation because each custom editor works like a standalone unit, offering you enclosed parts of code that communicate with each other really effectively. Once you implement a Custom Attribute Editor with all the various possibilities (which are requirements from the client), you will make your content manager’s life so much easier. To wrap this up, working with Page Designer Custom Components helped me a lot with the development. But, then again, don't rush into things. If you keep them clean and organized, your content will improve significantly.